In our first conversation about self-care, we established a core idea: the best routine is a personal one. Nowhere is this more true than with skincare. Walking down a skincare aisle can feel overwhelming, with countless products all promising amazing results. But the secret to finding what truly works isn’t in a bottle—it’s in understanding the canvas you’re working with: your skin.
Identifying your skin type is the most important first step in building an effective skincare routine. It’s the difference between choosing products that support your skin and choosing ones that work against it. Guessing can lead to frustration, wasted money, and skin that feels irritated or unbalanced. But you don’t need a dermatologist or a fancy gadget to figure it out. With a little patience and observation, you can discover your skin’s true nature right at home. This guide will walk you through two simple, reliable methods to identify your skin type once and for all.
Why Your Skin Type Matters
Think of your skin type as your skin’s baseline—its natural tendency for oil production and hydration. This baseline is primarily determined by genetics, but it can be influenced by factors like climate, hormones, and even your current routine. When you know your type, you can choose cleansers, moisturizers, and treatments with ingredients that cater directly to your skin’s needs, leading to a healthier, more balanced complexion.
The Two Best At-Home Methods to Determine Your Skin Type
Set aside some time when you can be at home without any makeup or products on your face. The evening is a perfect time to do this.
Method 1: The Bare-Faced Method
This method is the most straightforward. It allows you to observe how your skin behaves on its own, without any external influence.
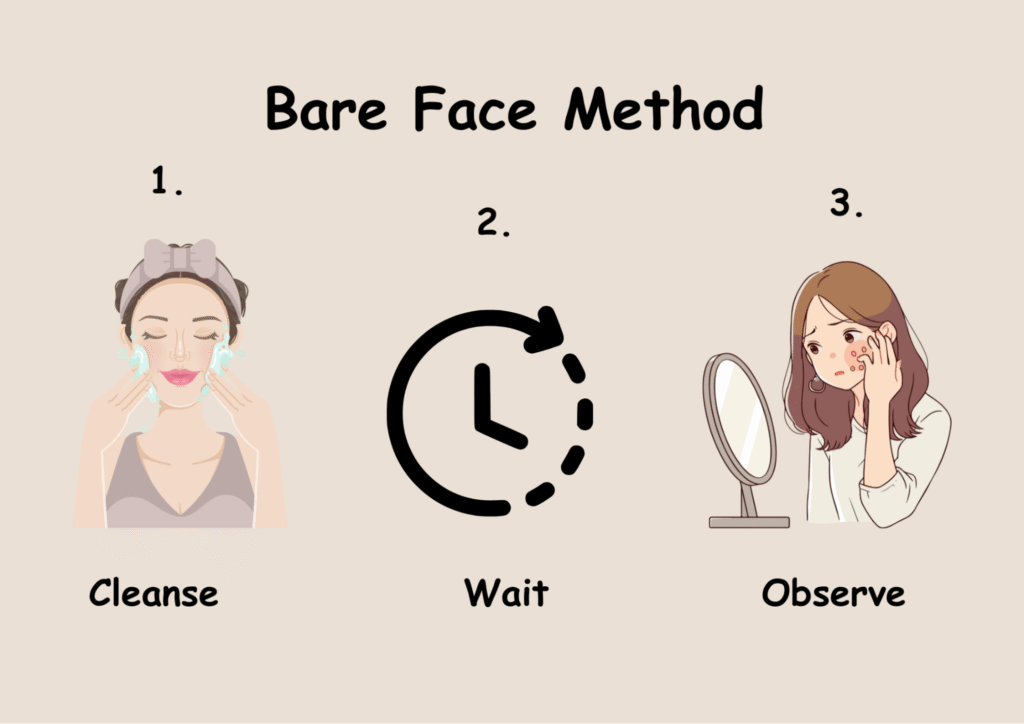
Step 1: Cleanse Your Face Thoroughly
Wash your face with a gentle, mild cleanser. You want to remove all makeup, dirt, and oil from the day. The goal is to get your skin to a neutral state, so avoid any harsh scrubs or medicated washes for this test.
Step-by-Step Guide:
- Use lukewarm water to wet your face.
- Apply a small amount of a gentle cleanser and massage it into your skin for about 60 seconds.
- Rinse completely and gently pat your face dry with a soft, clean towel. Do not rub.
Step 2: Wait and Observe (The Hard Part!)
Now, leave your skin completely bare. Don’t apply any serums, moisturizers, or toners. Set a timer for 30-60 minutes. During this time, go about your evening, but pay attention to how your skin feels. Does it feel tight? Is it getting shiny?
Step 3: Assess the Results
After the waiting period, stand in front of a mirror in good lighting and observe your skin closely.
- Dry Skin: Your skin feels tight, stretched, or even itchy. It may look a bit dull or show some fine, flaky patches. There is no visible shine on your cheeks, forehead, or nose.
- Oily Skin: You notice a distinct shine or a greasy feel all over your face, including your cheeks, forehead, and nose. Your pores may appear more prominent. The feeling of tightness has completely disappeared.
- Combination Skin: This is the most common skin type. You’ll notice a mix of oiliness and dryness. Typically, your T-zone (forehead, nose, and chin) will be shiny, while your cheeks feel normal or even tight and dry.
- Normal Skin: Your skin feels comfortable—not too tight, not too oily. You see little to no shine, redness, or flaking. It feels smooth and balanced.
Method 2: The Blotting Sheet Method
This method is a bit quicker and can give you a more visual confirmation of your oil production. It’s best for those who have a hard time distinguishing between a subtle glow and true oiliness.
Step 1: Cleanse and Wait
Just like the first method, start by washing your face with a gentle cleanser and patting it dry. Wait for about 30 minutes. This gives your skin time to return to its natural state of oil production.
Step 2: Press and Peel
Take clean blotting papers (you can find these at any drugstore) and gently press them onto different areas of your face. Focus on four key zones: your forehead, nose, chin, and each cheek. Hold the sheet against the skin for a few seconds to allow it to absorb any oil.
Step 3: Analyze the Sheets
Hold the blotting sheets up to the light to see the results.
- Dry Skin: The sheets will have little to no oil on them from any part of your face.
- Oily Skin: The sheets will be saturated with oil from all areas of your face.
- Combination Skin: The sheets from your T-zone (forehead, nose, chin) will show oil, while the sheets from your cheeks will be mostly dry.
- Normal Skin: You’ll see a minimal amount of oil on the sheets from all areas.
A Note on Sensitive Skin
Sensitive skin isn’t a “type” in the same way as oily or dry; it’s more of a condition that can accompany any skin type. You may have sensitive skin if your skin frequently reacts to new products, weather changes, or certain ingredients with redness, stinging, burning, or itchiness. If you have oily-sensitive skin or dry-sensitive skin, you’ll need to be extra careful about choosing gentle, fragrance-free products.
Your Skin, Understood
Congratulations. By taking the time to perform this simple test, you’ve moved beyond guessing and into understanding. This knowledge is the true foundation of your personal care routine. Now, when you look for a moisturizer, you’ll know whether to reach for a lightweight lotion or a rich cream. When you choose a cleanser, you’ll know to find one that hydrates your dry cheeks or balances your oily T-zone.
Your skin’s journey is a dynamic one, but with this foundational knowledge, you are perfectly equipped to listen, respond, and care for it with confidence.